How to Make an Epic Vegan Cheese Board Plus an Aged Vegan Cheese Recipe
Cheese boards are amazing for a date night, for a family dinner, and especially for the holiday season. There are no rules for making an epic vegan cheese board, so you can get as creative as you want here. That said, here are six tips to make sure your vegan cheese board is show-stopping every time.
How to Make a Vegan Cheese Board
1. Select a serving board
A wooden board or ceramic plate is always a good choice, whether they are rectangular, circular, or oval. If you don’t have a large board, then get creative! Use a salver or tray, a piece of wood, a baking tray, or simply a nice piece of parchment paper on your table.
2. Choose your vegan cheeses
For a good cheese board choose at least three different types of vegan cheeses. It’s good to mix textures and flavors. Choose something smooth like vegan feta, a soft homemade nut cheese, or cashew mozzarella.
Then choose something harder such as a vegan parmesan, a vegan cheddar, or sliced vegan cheese. And then something with lots of flavor and aroma like vegan camembert, aged cashew cheese, or cultured macadamia cheese.
3. Add fruit and vegetables
Go for the classics like grapes, figs, apples, pears, olives, artichokes, pickles, cherry tomatoes, or bell pepper. Or, try something more unusual like carrot sticks, fresh berries, cucumber slices, radishes, mandarine, pomegranate, or snow peas.
4. Pick something crunchy
Crackers, toasted nuts and seeds, and toasted bread or baguette slices are a must for a good cheeseboard. Play around with different sizes and shapes for a really cool finish.
5. Add something for dipping
Fruit preserves, jams, and spreads go amazing with vegan cheeses. For a surprising but very delicious spread try grainy mustard, hummus, or maple syrup as well.
6. Don’t forget about the finishing touches
Freshly ground black pepper, fresh herbs, or a sprinkle of toasted seeds will take your board to the next level. To give your board a ‘holiday touch’ add some cranberries, fresh rosemary, or even edible gold leaves.
Once you’ve gathered all your ingredients all you do is arrange them on your serving board. Keep your cheeses whole, or half, quarter, slice, dice or crumble them.
Depending on what fruits and vegetables you chose, you can also cut them into different shapes or keep them whole. Place everything next to each other, or place some of the ingredients into small bowls or jars. Serve your sauces in small dishes as well.
Then grab a fork, a cheese knife, or a food pick, and enjoy your beautiful and delicious vegan cheeseboard.
2 Vegan Cheese Board Ideas
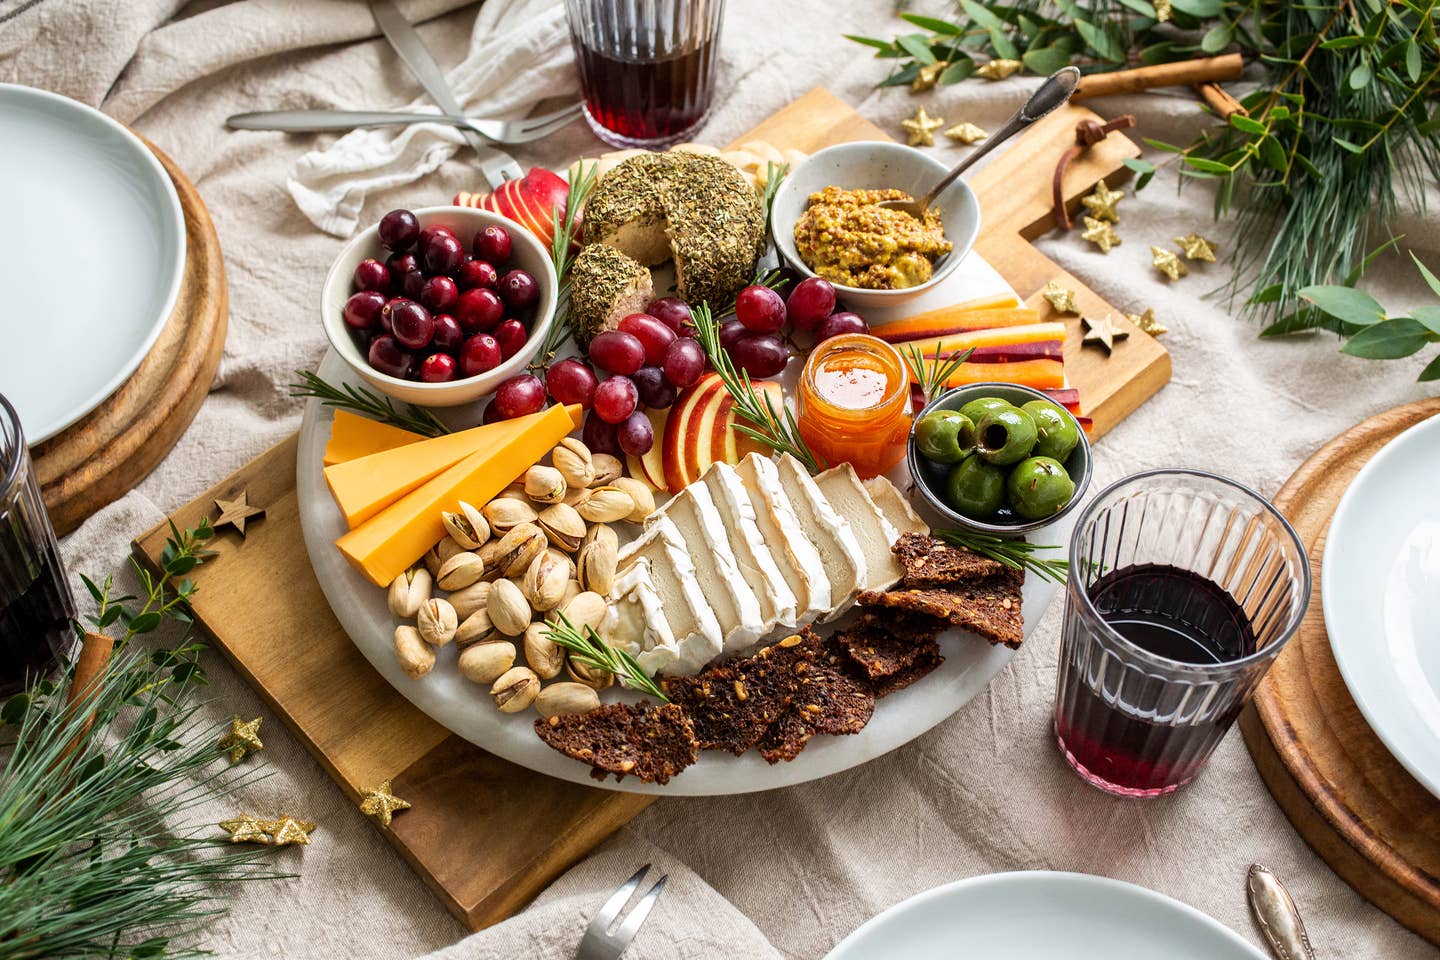
Vegan Cheese Board Idea #1
- Vegan Camembert
- Pumpernickel chips
- Pistachio
- Vegan cheddar
- Cranberries
- Grapes
- Aged vegan cheese
- Apple slices
- Blanched almonds
- Chili - apricot preserve
- Grainy mustard
- Rainbow carrots
- Marinated green olives
Vegan Cheese Board Idea #2
- Mini bell peppers
- Smoked vegan cheese
- Grapes
- Blanched almonds
- Cucumber
- Pumpkin seed crackers
- Carrot sticks
- Apple slices
- Aged vegan cheese
- Cherry tomatoes
- Kalamata olives
- Beet hummus
- Vegan feta
- Snow peas
How to Make Nut Cheese
Making nut-based vegan cheese at home might sound intimidating at first, but it’s actually an easy and really fun process. Though it takes some time until your cheese will reach the desired taste and consistency, you don’t have a lot of active work with it.
The base of our vegan aged cheese is cashew, which gives the creamiest, smoothest finish. You can also experiment with other nuts or seeds if you are looking for a different flavor. Macadamia, walnuts, (blanched) almonds or sunflower seeds are all great options.
How to Make Vegan Cheese That Tastes Like Real Dairy
To flavor the cheese we use vinegar (or lemon juice), nutritional yeast, miso, and some salt. And then what gives the cheese its tang and aged taste is rejuvelac and probiotics.
Rejuvelac is a fermented drink made out of sprouted wheat. It’s an extremely nutritious beverage, that also helps to ferment our cheese. You can buy rejuvelac in some health stores, or you can make your own at home.
Besides, rejuvelac probiotics will also help you to age your cheese, and to get that awesome tanginess and sharpness we love in cheeses. Plus they are great for improving gut health.
Depending on how long your fermenting time is, your cheese can taste differently. Go for a short fermenting time for a mild version, or a longer one for a very sharp cheese.
Once you’ve reached the desired fermentation level, you can eat the cheese directly, as a softer almost goat cheese-like. This version is especially delicious with fresh or dried herbs and lots of garlic.
If you are looking for a harder, sliceable cheese, you can dehydrate or bake your fermented mix. At this point, you can also mix in extras like chili, garlic, herbs, turmeric, black pepper, chopped dry fruits, or whatever else you like. After dehydrating you can enjoy your cheese immediately, or age it for up to 3 weeks in the fridge.
Prep time/active work: 20 minutes
Fermentation time: 12-96 hours
Dehydrating: 3-8 hours
Vegan Aged Cashew Cheese
Makes 2 cheese rounds. Aging: up to 3 weeks
Ingredients
- 2 cups of cashews, soaked overnight
- 1/2 cup of rejuvelac
- 2 tbsp apple cider vinegar (or lemon juice)
- 2 capsules probiotics
- 1 tbsp white miso paste
- 1/3 cup nutritional yeast
- salt
Instructions
- Add drained cashews, rejuvelac, vinegar, probiotics, miso, nutritional yeast, and a large pinch of salt into a high-speed blender, and blend until completely creamy and smooth.
- This might take a couple of minutes, depending on how powerful your blender is. Stop to scrape down sides occasionally, if needed.
- Place a fine mesh strainer over a bowl. Lay down two layers of cheesecloth on top. Transfer the vegan cheese mixture over the cloth, then gather corners to wrap it in a tight bundle. Tie with a string or twine.
- Cover the bowl with a kitchen towel, and let the cheese ferment at room temperature for 12-96 hours, depending on how sharp you like it. Go for 12-24 hours of fermenting time for a mild version, or 72-96 hours for a very sharp cheese.
- After fermentation time place the vegan cheese in the fridge for 1-2 hours, so it’s easier to handle.
- Shape the cheese into a round using a mold or just your hands. At this point, you can also mix in extras like chili, garlic, herbs, turmeric, black pepper, chopped dry fruits, or whatever else you like.
You can eat the cheese like this directly as a softer, spreadable cheese. - If you want a harder cheese, place your cheese in the dehydrator (or in the oven on the lowest heat - 50°C/120℉), and dehydrate for 3-8 hours. This should give you a nice outer rind.
- Serve the vegan aged cheese now immediately, or age it in the fridge for up to 3 weeks. Simply place your cheese on a plate and cover it with a bowl, so it has some air around it. Check on your cheese every day and turn it upside down to make sure it doesn’t get any mold.
- Before serving your vegan aged cheeses you can roll them into fresh or dried herbs, chili powder, smoked paprika, cracked pink or black peppercorns, chopped pistachio, or dried cranberries.
Vegan Aged Cheese Nutrition Facts
Servings 4
Calories 469 | Total Fat 33.4g | Saturated Fat 6.4g | Cholesterol 4mg | Sodium 761mg | Total Carbohydrate 33.7g | Dietary Fiber 6.4g | Total Sugars 3.7g | Protein 17.9g | Calcium 47mg | Iron 7mg | Potassium 742mg |
Vegan Cheese Recipes You Might Like:
More From The Beet
