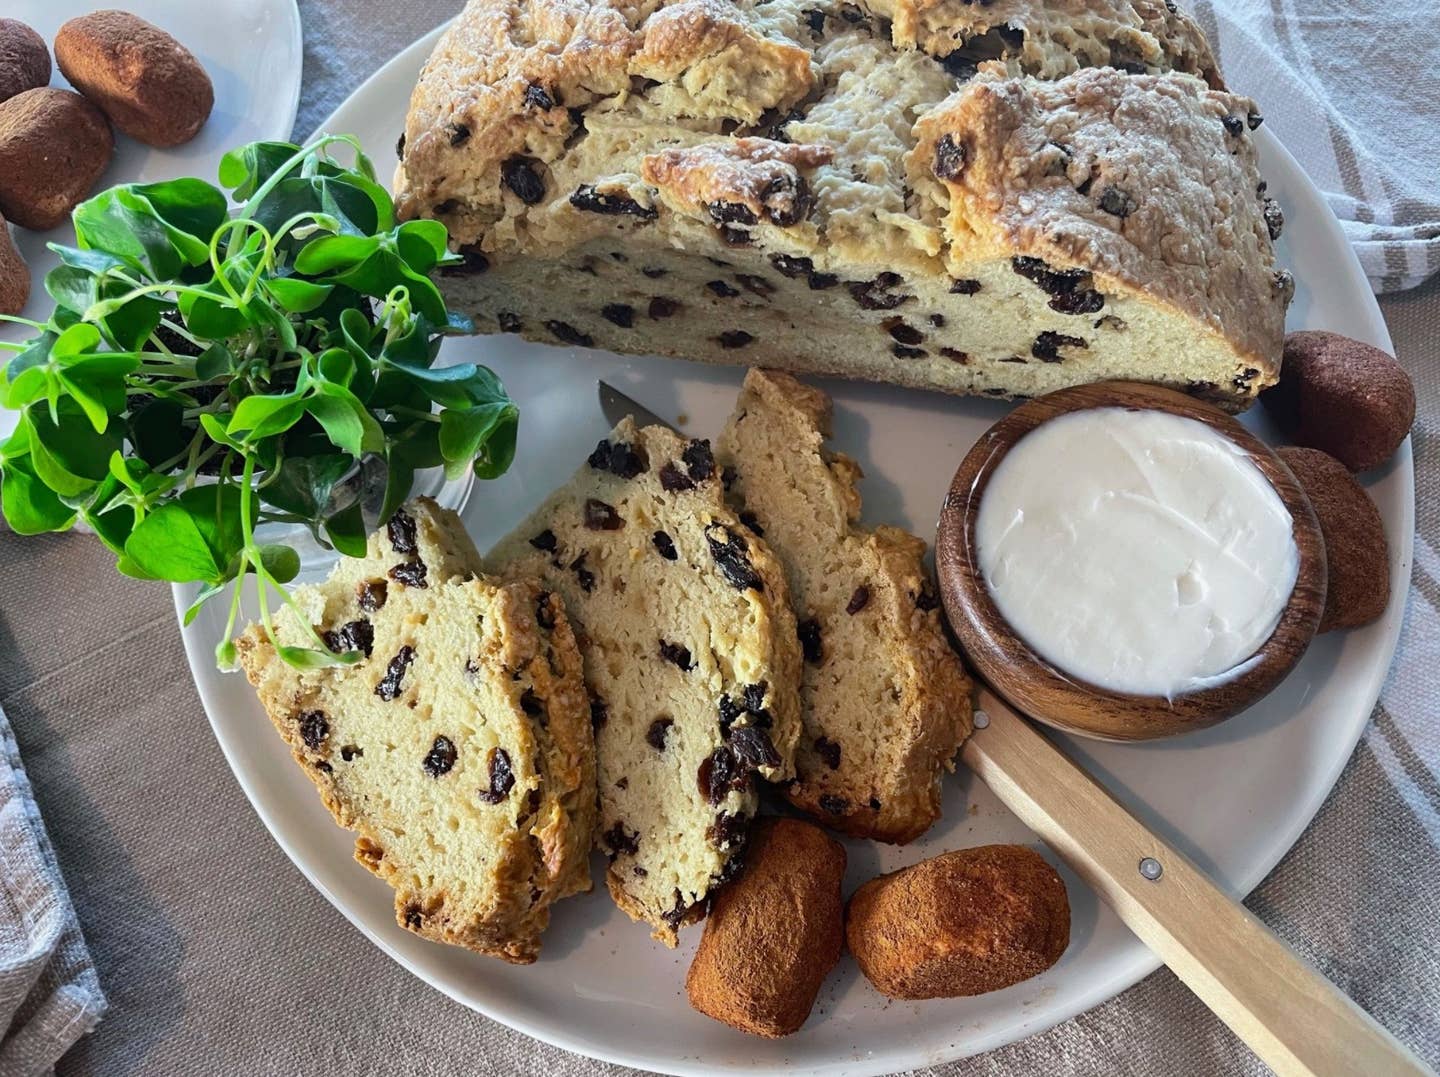
Celebrate St. Paddy’s Day With Irish Soda Bread and Irish Potato Candy
There is, undoubtedly, a misconception that plant-based eating is limited, especially around celebratory occasions and holidays.
I actually enjoy holidays more than ever as a plant-based eater, because I have the opportunity to create new traditions and reimagine old ones. One of my favorite festive activities is to recreate classic dishes and feed them to my friends and family. My goal is always to create simple, crowd-pleasing recipes. There’s nothing wrong with serving a tolerable vegan substitute, but why not strive to wow your guests?
This St. Patrick’s day, I made two iconic holiday treats that not only contend with the originals, but they might also actually be better.
The first recipe is a Vegan Irish Soda Bread with crispy edges and a soft, spongy texture in the middle. The original recipe for soda bread calls for eggs, buttermilk, and butter. We simply omitted the eggs and swapped the butter for plant butter. To create buttermilk, we used a mixture of apple cider vinegar and soy milk. I prefer to use soy milk over other plant milk because soy milk has more fat, which creates a very similar consistency to real buttermilk. The combination of soy milk and apple cider vinegar adds a subtle flavor to the bread that the original recipe just doesn’t have. It's so good that even your omnivore friends will want the recipe.
This bread can be served as is or with plant butter. If you have any leftover the next day, it’s also great warmed in the toaster, topped with a little plant butter and some strawberry jam.

The second recipe is sweet Irish potato candy recipe, a traditional dish served as a side with your Irish Soda Bread.
Growing up, I always knew St. Patrick’s day was right around the corner when I’d see these little Irish potato candies, in their white boxes, next to the cash register at every store in my neighborhood. From candy shops and grocery stores to family-owned delis and Wawas, you’d see these little guys everywhere.
It wasn’t until l I moved to New York City that I found out that these (very) sweet confections were a regional delicacy. They originated in Philadelphia, so it’s no surprise that the original recipe calls for cream cheese. But, I made a couple of plant-based tweaks and they certainly fit the bill. I popped one in my mouth and could almost hear my grandmother reminding me not to wipe the cinnamon on my pants.
This version of Irish Soda Bread tastes better than the original. I promise.

Vegan Irish Soda Bread
Makes 1 loaf
Ingredients
- 1¾ Cups Unsweetened, Plain Soy Milk
- 1 Tbsp. Apple Cider Vinegar
- 4¼ Cups All-Purpose Flour, plus more for kneading
- 3 Tbsp. Granulated Sugar, plus more for sprinkling
- 1½ tsp. Baking Soda
- 1 tsp. Fine Sea Salt
- 5 Tbsp. Plant Butter (Earth Balance buttery sticks), cut into cubes and frozen for at least 20 minutes, plus more for greasing
- 1 Cup Currants
Instructions
- Preheat an oven to 375° F. Prepare a baking dish or cast-iron skillet by greasing it with plant butter and set it aside until needed.
- Measure out 1 Tablespoon of soy milk into a small bowl and reserve for later use.
- Add the apple cider vinegar to the remaining soy milk and stir to combine. Allow the mixture to sit on the counter for at least 5 minutes, creating a vegan buttermilk substitute.
- In a large mixing bowl, whisk the all-purpose flour to break up any clumps in the flour.
- This is a great little trick for breaking up flour that you can use when you don’t have a proper sieve or don’t feel like sifting flour. It’s not as thorough, so I wouldn’t use it for delicate desserts or pastries, but it works well for most simple preparations.
- Add the sugar, baking soda, and salt. Whisk again, just until the ingredients are evenly dispersed throughout the flour.
- Add the frozen butter and work it into the flour, with your hands, until the mixture becomes sandy in texture.
- For this step, it is important to work quickly, as the butter chunks are the key to creating moist bread. You want the butter chunks to melt during the baking process, not beforehand. The heat from your hands will melt the butter, so be mindful of that.
- I like to pick up the flour and butter and rub everything together, allowing it to fall into the bowl and repeating until the sandy texture that we are looking for is created. Remember, it doesn’t have to be perfect. It’s better to leave some larger chunks than it is to overwork the butter.
- When the dough has reached a sandy, packable texture, mix in the currants.
- Add the “buttermilk” and gently incorporate with your hands.
- The dough will be very clumpy and sticky at this point. Don’t stress- that’s exactly what you’re looking for.
- Turn the dough onto a floured work surface and, with floured hands, knead the dough for about 1 minute, or until it comes together and all of the flour is worked in.
- The outside of the dough will still be a little tacky to the touch. That’s perfect.
- Transfer the dough ball to a prepared baking dish. Score the top with a knife, creating an “x,” about ¼-inch deep, on the top. Brush the top with the reserved soy milk and sprinkle with sugar.
- Brushing the top with milk and sugar is certainly not a traditional step and it is completely optional. However, the milk and sugar will help give your bread a beautiful, golden brown color. And, the crunchy, sugary bits just complete that perfectly homemade aesthetic.
- Bake for 45 minutes, or until golden brown and a cake tester comes out clean. Allow the bread to cool for 5-10 minutes and transfer to a baking rack. Allow the bread to cool completely before slicing.

Vegan Irish Potato Candy
Yields 50 Candies
Ingredients
- 4 Ounces Vegan Cream Cheese, softened at room temperature
- 4 Ounces Plant Butter, softened at room temperature
- 1 tsp. Vanilla Extract
- 1 Pinch Sea Salt
- 4 Cups Powdered Sugar
- 2½ Cups Shredded Coconut
- ¼ -½ Cup Ground Cinnamon, or as needed
Instructions
- Place softened butter and cream cheese in a large mixing bowl. Using a hand-held or stand mixer, cream the two together for 1-2 minutes.
- Add the vanilla extract and a pinch of salt. Mix to combine.
- Add a spoonful of powdered sugar to the cream cheese mixture and beat until incorporated. Scrape down the sides and repeat until all of the sugar is mixed in.
- When using a handheld mixer, I like to gently work the sugar into the butter mixture with a rubber spatula before using the beaters. It helps distribute the powdered sugar and is a little less messy.
- Add the shredded coconut to the mixture and mix again, scraping down the sides occasionally, until the coconut and cream cheese mixture is combined.
- Cover the mixture with plastic wrap and refrigerate for 20-30 minutes.
- Chilling the mixture makes it easier to shape, in addition to allowing time for the coconut to hydrate, which improves the texture of the candy.
- While the mixture is in the refrigerator, make an assembly line for your candy. Place cinnamon in a shallow bowl and line a baking sheet with parchment, foil, or a silicone mat.
- Remove the chilled mixture and, using a small spoon, portion the mixture in your hands and roll into potato-like shapes. Drop the shaped mixture into the cinnamon and roll around until its completed coated. Move the potatoes onto the prepared baking sheet. Repeat until the mixture is completely used up and coated in cinnamon.
- This step is so much fun to do with kids or friends. They have the appearance of real potatoes because of their imperfections so don’t stress over their shapes.
- Refrigerate the candy for at least 1 hour before serving.
- If making in advance, freeze them in a single layer on the baking sheet. When they firm up, transfer them to a smaller vessel to free up more space in your freezer. They will keep frozen for 1 month.

More From The Beet